TL;DR
A closet can become a surprisingly effective space for recording or hosting a rig with the right acoustic treatment, mic placement, and ventilation. Moving the rig into another room is the simplest fix, but if you want it in the closet, prioritize absorption and airflow to avoid heat buildup and echo.
Ever wondered why your closet sounds so boxy or why your powerful AI rig keeps overheating? The secret isn’t just about slapping foam on the walls. It’s about where you put your gear, how you treat the surfaces, and making sure heat can escape.
In this guide, you’ll learn how to turn a tiny closet into a quiet, efficient workspace—whether for recording vocals or running a noisy AI rig. Expect practical tips, real examples, and a focus on what actually makes a difference.
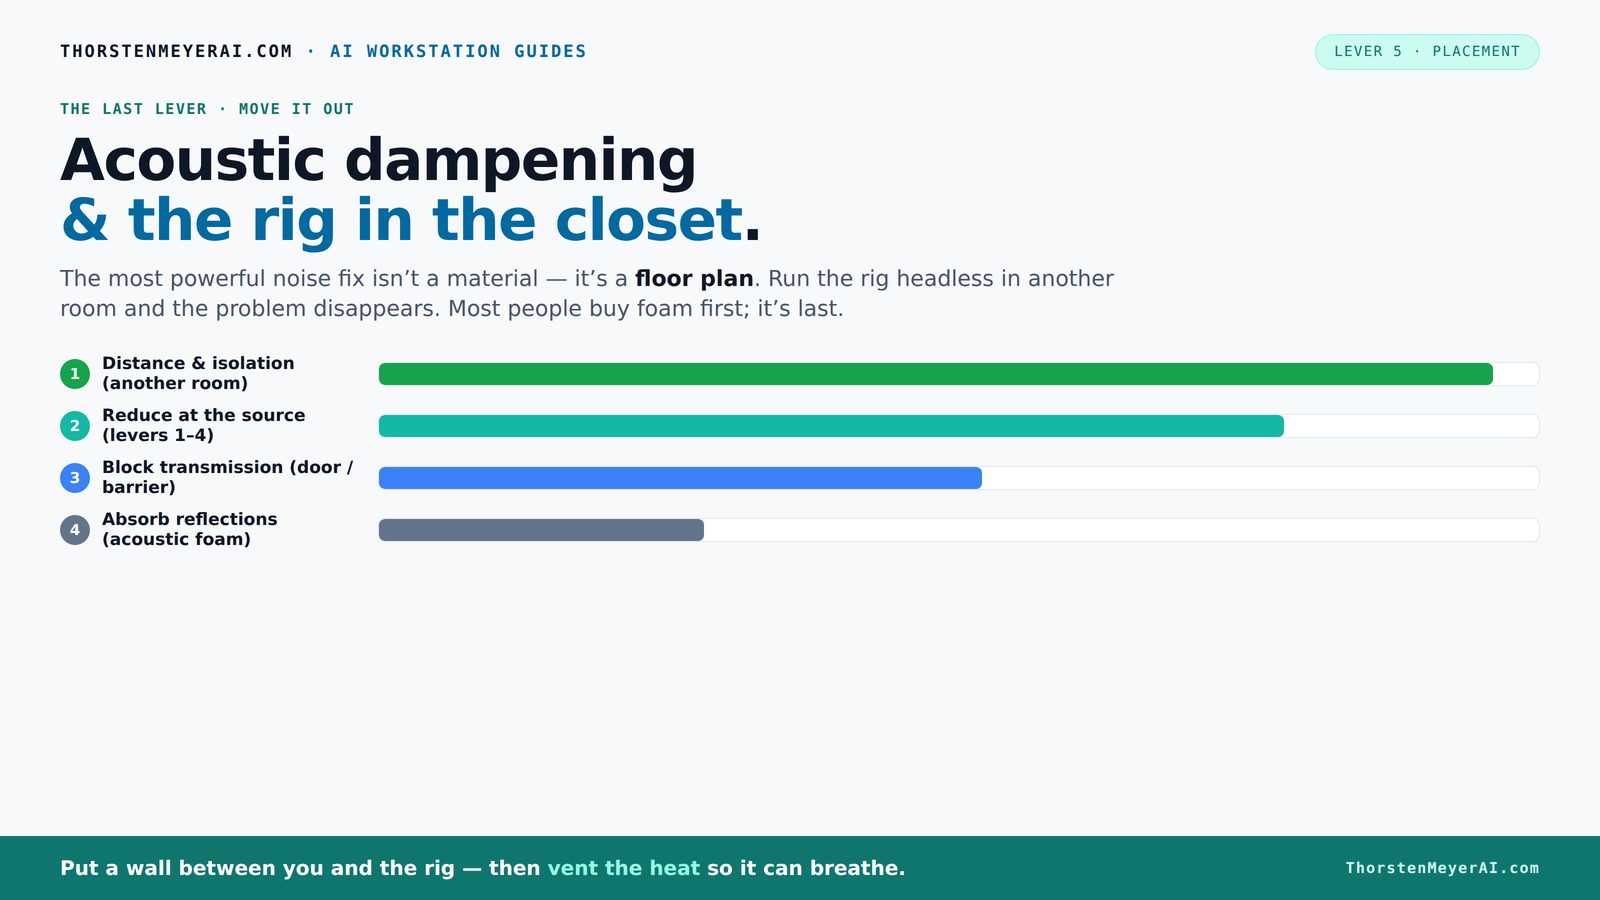
Acoustic dampening
& the rig in the closet.
The most powerful noise fix isn’t a material — it’s a floor plan. A rig you can’t hear because it’s in another room beats any amount of foam. Tap the approaches in Part 1 to see what actually works.
(another room)
(levers 1–4)
(door / barrier)
(acoustic foam)
Contain the noise, not the heat
Key Takeaways
- Moving your rig into another room is the simplest way to cut noise and heat issues entirely.
- In closet setups, focus on strategic placement of absorption—reflection points matter more than covering every surface.
- Ventilation is critical; without airflow, heat traps can turn your closet into a hotbox, throttling performance and increasing noise.
- Seal gaps and treat door leaks to prevent sound leakage, but always combine with airflow solutions.
- Use affordable DIY materials like foam panels, blankets, and rubber feet—cost-effective and effective for small spaces.
soundproofing foam panels for recording studio
As an affiliate, we earn on qualifying purchases.
As an affiliate, we earn on qualifying purchases.
Why Distance Beats Foam Every Time for Noise Control
Distance is your best friend when it comes to noise reduction. Moving your rig into another room—say, a basement or closet—can cut noise by over 90% compared to just adding foam. Think of it like turning down the volume at the source, not just muffling it.
Imagine your GPU roaring at 80 dB. Placing it in a closet with a door and a vent can bring that down to below 30 dB, almost silent. This is because sound diminishes rapidly with distance, and barriers block transmission.
For an AI workspace, this means your loud, heat-generating rig doesn’t have to be next to you. You can SSH into it while it roars in a closet on the other side of the house, leaving your work area peaceful. Check out this AI security and workspace setup for more tips. It’s the biggest win for both noise and heat management.
acoustic treatment for small rooms
As an affiliate, we earn on qualifying purchases.
As an affiliate, we earn on qualifying purchases.
The 'Rig in the Closet' Setup: How to Keep It Cool and Quiet
Putting a high-performance, heat-generating rig inside a closet is tempting, but heat buildup is the biggest challenge. Without proper airflow, trapped heat makes fans scream and throttles performance.
The trick is to give your closet a way to breathe. Install passive vents or, better yet, a quiet exhaust fan that pulls hot air out. This keeps temperatures stable and fans quiet.
Consider a purpose-built soundproof cabinet with ducted airflow, which combines absorption with active cooling. You’ll find these units can dissipate kilowatts of heat while keeping noise under 36 dB — a perfect combo for a closet setup [2].
For example, if your GPU dumps 600W of heat, a simple vent with a small fan can keep the air moving, preventing the room from frying your components. Check out this [cooling guide](https://thorstenmeyerai.com/reduce-heat-noise-ai-workstation/) for detailed strategies.
ventilation fans for closet recording space
As an affiliate, we earn on qualifying purchases.
As an affiliate, we earn on qualifying purchases.
Acoustic Treatment in Small Spaces: Where to Focus First
Acoustic dampening in small, enclosed spaces like closets isn’t about total soundproofing; it’s about control. The goal is to reduce echo, prevent boxiness, and improve clarity, not block all sound.
Start by treating the reflection points—behind the mic, the side walls, and the ceiling—where sound bounces back into your mic. Use foam panels, blankets, or even hanging rugs. For example, a simple foam panel placed behind your mic can make vocals sound crisper.
While bass traps are less critical in tiny spaces, they can tame low-end buildup from parallel surfaces. Adding corner bass traps or foam wedges helps prevent that 'boomy' sound.
Remember, focus on the surfaces most likely to send reflections into your mic, not just covering every inch. Use this [reflection point guide](https://thorstenmeyerai.com/low-noise-pc-cases-airflow/) for a visual plan.
portable soundproof booth for home studio
As an affiliate, we earn on qualifying purchases.
As an affiliate, we earn on qualifying purchases.
How to Treat the Closet Door and Gaps for Better Sound Control
The closet door is often the weakest link in your soundproofing chain. Gaps, cracks, and hinges let sound leak out—making your effort pointless if ignored.
Seal gaps with weatherstripping or acoustic sealant. Hanging a blanket or foam over the door can help, especially if you can overlap the edges. For example, use a thick moving blanket secured with bungee cords or velcro to block sound leaks.
In a vocal booth, sealing the door can cut echo and reverberation significantly. But remember, a door that’s too airtight without ventilation can trap heat, so combine it with airflow solutions.
This approach is quick, inexpensive, and effective. Here’s a simple [door sealing checklist](https://soundproofcow.com/how-to-soundproof-closet/) to get you started.
Corners, Reflections, and Bass: Why Small Rooms Play Tricks on You
Small rooms and closets tend to amplify bass and create standing waves—making your recordings sound boomy or hollow. In tight spaces, parallel walls reflect sound back and forth, causing low-frequency buildup.
Adding bass traps in the corners absorbs these low-end frequencies. For example, foam wedges or fiberglass traps fill the corners and smooth out that 'boxy' sound.
Using a combination of absorption and diffusers can help balance the sound. Think of it like tuning a musical instrument—small adjustments make a big difference.
Applying these treatments prevents the room from sounding like a cardboard box. Check out this [bass treatment guide](https://thorstenmeyerai.com/low-noise-pc-cases-airflow/) for detailed placement tips.
Budget-Friendly Materials for Your Closet Rig
You don’t need to break the bank to improve your closet’s acoustics. Common DIY materials work wonders—think foam panels, moving blankets, rugs, and weatherstripping.
For example, hanging a thick blanket over the door and lining the walls with foam panels can cut echo and reflections. Using a few rubber feet under your PC tower reduces vibration noise and structure-borne hum.
Simple accessories like towels or curtain rods make mounting easier and cheaper. For a comprehensive approach, combine these with DIY bass traps built from rockwool or fiberglass.
Want to see what a budget setup looks like? Check this [DIY acoustic treatment](https://thorstenmeyerai.com/low-noise-pc-cases-airflow/) for inspiration.
Common Mistakes in Small Closet Voice Booths and How to Avoid Them
Many DIY closet booths fall into traps that sabotage their effectiveness. The biggest mistake? Overlooking reflections and focusing solely on thick foam or blankets. Sound quality suffers when surfaces aren’t treated at reflection points.
Another mistake is sealing everything tightly without airflow, which leads to heat buildup and equipment throttling. Always balance sound treatment with ventilation.
Finally, relying only on foam panels without addressing door leaks or corner bass buildup leaves your space echoey and boomy. Use targeted treatments—like sealing gaps and adding bass traps—for best results.
This quick checklist can help you avoid the typical pitfalls and get your closet setup sounding professional.
Frequently Asked Questions
Can I turn a closet into a real vocal booth?
Yes, you can improve a closet for vocals by adding absorption, sealing gaps, and controlling reflections. However, complete soundproofing requires more structural work. For best results, treat reflection points and consider door sealing and bass traps.
Where should I put acoustic panels or foam first?
Start by placing panels at reflection points—behind the mic, on side walls, and the ceiling. This reduces echo and improves clarity more than covering every wall. Use a mirror trick to find these points.
Do I need bass traps in a small closet?
Yes, especially in corners where low frequencies tend to accumulate, causing boomy sounds. Bass traps help smooth out the low-end and prevent a boxy, muffled sound.
How should I treat the closet door and gaps?
Seal gaps with weatherstripping or acoustic sealant. Hang heavy blankets or foam over the door to block sound leaks. Always balance sealing with proper ventilation to prevent heat buildup.
Will foam alone improve recording quality or is more needed?
Foam helps reduce echo and reflections but doesn’t block sound leaks or low-end buildup. Combine foam with door sealing, bass traps, and ventilation for a truly improved space.
Conclusion
The biggest win in a closet rig isn’t just acoustic foam or sealing; it’s smart placement combined with ventilation. If you treat the right surfaces and keep the heat moving out, your closet can go from echo chamber to professional-grade space.
Remember, your gear doesn’t have to be loud or hot to do its job. Focus on where sound goes and how heat escapes, and you’ll be amazed at what you can achieve in a tiny, quiet corner of your home.